Create your own browser
Have you ever expected to use your own browser design? With BrowserBob, creating a custom web browser can help you implement your idea. Buttons with many other styles, sometimes you even have the idea to put the Forward and Back buttons at the bottom of the screen, or put the picture of a pet in your home as an application icon in the left corner. on the browser?
When creating a browser for yourself, you need to choose what to add in that browser and make it beautiful, but you can be assured of these complexes using only the functions. drag and drop without programming.
BrowserBob has all the necessary features to assemble into a basic browser. We recommend that you start by compiling a fast, simple, and convenient browser for your regular web browsing (in other words, the browser content layout). You may then want to dive into editing those fixed components, adjust icons, backgrounds, etc. This may be a big 'building' depending on what you want to customize the chapter. submit.
When working on your browser, you should periodically choose File | Save and save your 'works' as certain files such as Bob.BB Browser , so you can go back and make changes if necessary. Once the browser is finished, you can compile it into a standard executable file that will work regardless of whether BrowserBob is installed or not.
Steps to proceed :
Create a basic browser
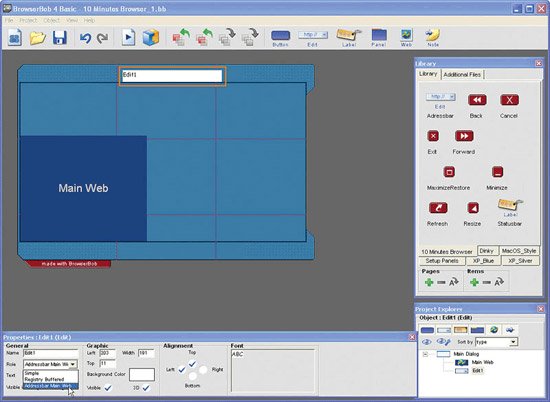
To start, select File | New and click the Samples tab. "10 Minutes Browser" is a good initial option, it will be started with basic design window. To navigate, you need an address bar, so drag an Edit box from the toolbar to the top corner of the browser. From the Properties tab , locate the Role list and select AddressBar MainWeb to configure the role.
Add more buttons
The browser area marked Main Web, it will be very small by default; You choose and drag it out to make it easier to see. You will need forward and back buttons to perform typical browser browsing tasks. Locate the Library panel floating, click the 10 Minutes Browser tab, and drag the buttons you want to use into the browser window where you want to place.

Check the Properties panel to see which buttons have been compiled. You can load other objects (they have the .bof extension) by selecting Object | Load and locate them on your hard drive. The contents of the BOF file include images (editable in the image editor) and other actions that you can change within BrowserBob itself. Later, when creating the buttons for yourself, you will need four images for each button.
Create a browser that can resize
Without the extension, the browser window will not change in size when you are using the application. Drag the Resize button from inside the Library library into the lower right corner of the browser. Its target is Main Dialog and its action is Resize .

Consider whether you want your buttons to move when the window changes in size. Click and adjust their sort order in the Properties property area to indicate where it will be located. In my example, the Forward and Back buttons shown here are placed at the bottom and left. Set the sort order of Address bar to Top, Right and Left so that it can change according to the size of the window.
Red lines (called Puzzle lines) are quite important because they limit the areas that will be extended when the window is changed. When designing background images, be careful to align these lines to avoid unsightly deflection when it is resized.
More meticulous designs
To search deeper in customization, you can edit the components provided in your graphics software. Click the Edit menu for the BrowserBob window and click the Edit Image button to get the correct file name. Photos are opened in editing software and you can edit them or change the whole picture. Be careful with making a copy of the buttons before you change them and save the new images in the same format as the original file.

You can also create your own button images. For each node, you need to have four states: default, touched, pressed, and disabled. (You can use the same image for one or more states). Once you have configured the options you can save them in the BOF file in other projects.

To create a floating image on the page and that image is not rectangular, you need to add the surrounding colors. Then, configure it in BrowserBob to be transparent. Choose a picture; then in the properties bar, click on the Pick Color tool (eyedropper); Finally, click on the surrounding color to make it transparent.
Check and use
This is the time to bring your browser to preview - click on the Test icon (which looks like the Play button) and try running it. When ready to use them, choose Project | Build and click Executable . Name the file, select the folder to save the file, and then click Build. This executable file is all that will be used as your browser in the future.

Van Linh
- Acoo browser: mesmerizing web browser
- Detection of vulnerabilities in Firefox browser
- Why is the browser running slow and how to fix it?
- How to change the default browser on Windows 10
- Top most downloaded browsers for Android
- Better browsing with Avant Browser
- Browzar: Browser with
- The IE browser was officially replaced by Spartan
- Next to the browser is the 'battle' toolbar
- Yolo - First mobile web browser made in Vietnam
- 15-year-old male student makes his own web browser and virtual assistant in Vietnam
- Some tricks in Internet Explorer 7
 What is the Snapdragon SiP chip?
 How to create a yellow circle around the mouse cursor on Windows
 Edit the Boot.ini file in Windows XP
 History of formation and development of computers