Macromedia Flash - Program flash download design
In this article, Network Administrator would like to guide you how to design an interface that is loading the program using Actions Script. You can use to create a template like in a lesson or create any image you want.

Step 1
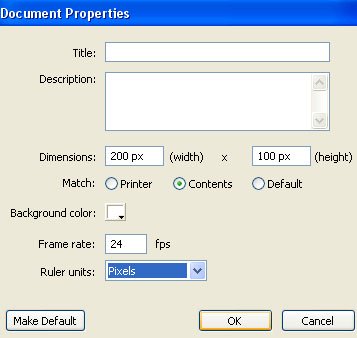
Open Flash and create a new file of size 200x100px. Select white as background color and set the Frame rate to 24, then click OK.

Step 2
Use the Oval Tool (O). In the Colors section of the Tool panel, remove the Stroke color by clicking on the small pen icon, then select the small box with the red slash line. In Fill color choose # F80000 and draw 3 circles as shown below:

Step 3
After drawing 3 circles, use the Line Tool (N). Select the stroke color # F80000 and the Solid part to select the stroke with a thickness of 0.5.

Then draw the following figures

Step 4
Using the Paint Bucket Tool (K), Fill color select # F80000 and fill the color created in the previous step.

Step 5
Press Ctrl + A (Select all) and then press F8 key (Convert to Symbol) to convert the entire picture into a Movie Clip Symbol. See the picture below.

Step 6
Double-click the movie clip and you'll see the inside of the movie.

Step 7
Double click on layer 1 to rename. Click on frame 100 and press F5 key. Then create a new layer above the image layer and name it mask.
Step 8
Select the mask layer, take the Rectangle Tool (R). In the Colors section of the Tool panel, remove the Stroke color by clicking on the small pen icon and then draw a rectangle like the image below.

Step 9
Click on frame 100 and press F6 key. Then use your mouse or arrow keys to drag the rectangle over the original picture.

Step 10
Right-click anywhere on the gray area between the two keyframes and select Create Motion Tween from the menu that appears.

Step 11
Select the mask layer and convert it to a mask by right-clicking on the layer and selecting Mask.


Step 12
Create a new layer above the mask layer and name it percent (percent).
Step 13
Select percent layer and click the Text tool (T). Go to the Properties Panel (Ctrl + F3) below and select the following options:
a) Select Dynamic Text
b) Select Lucida Sans font
c) Select 11 font size and bold type.
d) Choose color as # 323232
e) Select Anti-alias for readability
f) In Var field: enter percen101

Then enter one into a 99% value below the image.

Step 14
Return to the main scene (Scene1)

Step 15
Pick the Selection Tool (V), click once on the preloader to select it and open the Action Script Panel (F9). Then include the following code:
onClipEvent (load) {
total = _root.getBytesTotal ();
}
onClipEvent (enterFrame) {
loaded = _root.getBytesLoaded ();
percent = int (loaded / total * 100);
percen101 = "" + percent + "%";
gotoAndStop (percent);
if (loaded == total) {
_root.gotoAndPlay (2);
}
}
So we have completed the preloader. To see how it works, click on the first frame and again use the Action Script Panel tool to bring the following code into:
stop ();
Then create a new layer above the preloader layer, click on the second frame and press F6 key. Then, Import, position, create effects, photos, movies. And click again on the second frame, enter the stop () command; go to the Action panel. Try running the created file or download the sample file here.
- Security error in Macromedia Flash
- Adobe Flash software for mobile devices
- Arising a serious flaw in Macromedia products
- Link download programs on Adobe.com
- Adobe and Macromedia work together Creative Suite 3
- Macromedia Flash - Digital clock
- MS Office has security problems
- The best free download support tools available today
- Use flash movies as wallpapers with Flash Wallpaper Maker 2.01 (FWM 2.01)
- The history of Flash - from dynamite to light-emitting diodes
- Create your own flash album to share with everyone
- Convert AutoCAD to flash
 What is the Snapdragon SiP chip?
 How to create a yellow circle around the mouse cursor on Windows
 Edit the Boot.ini file in Windows XP
 3 ways to restart the remote computer via the Internet
 Video: The 'supreme' mummification process of the ancient Egyptians
  Instructions to create a notebook with elementary handwriting in Word
  10 steps to help you clean your air conditioner at home safely
  Homemade telescope watching the moon with 2 plastic bottles
  NASA first announced tens of thousands of hours of recording of the Apollo 11 mission to the Moon
  5 videos tell you Elon Musk's detailed plan to bring people to Mars