Instructions to remove the screen from the desktop in Windows 10
You can prevent Windows 10 from using the connected screen without disconnecting it , then easily allow Windows 10 to use the screen again when desired.
This basically allows you to remove and restore an connected external monitor as needed, without having to physically disconnect and reconnect the monitor or turn the monitor on or off.
This guide will show you how to remove the screen from the desktop to prevent Windows 10 from using the screen and restore it when desired .
Remove the screen from the desktop in Settings
Note:
- You must be logged in as an admin to use this option.
- This option is independent of option 2 below.
1. Open Settings and click on the System icon .
2. Click Display on the left side and click the Advanced display settings link on the bottom right.
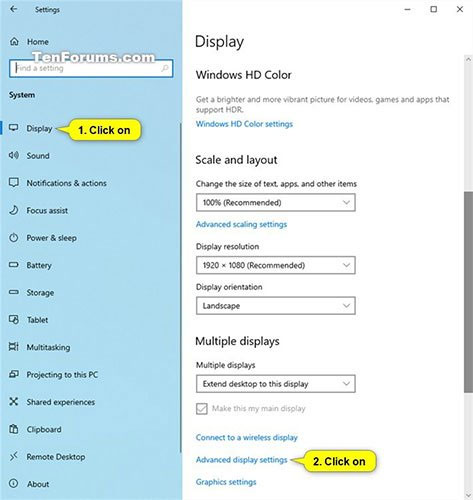
Click the Advanced display settings link at the bottom right.
3. Select the screen you want to remove or restore in the Choose display drop-down menu .
4. Turn on (remove) or turn off (restore) the Remove display from desktop option, depending on what you want and the current state of the screen.

5. You can now close Settings if desired.
Remove the monitor from the desktop in the NVIDIA Control Panel
Note:
- This option is only available if you have installed drivers and NVIDIA graphics.
- This option is independent of option 1 above.
1. Open the NVIDIA Control Panel (for example, from the context menu on the screen or the notification icon).
2. Click the Set up multiple displays link in Display on the left.

Click the Set up multiple displays link.
3. In the Select the displays section you want to use on the right, select (restore) or deselect (remove) the screen, depending on what you want and click Apply.

Select (restore) or deselect (remove) the screen.
4. Click Yes in the Apply Changes dialog box when prompted to confirm.
Note : If needed, the changes will revert automatically after 20 seconds if you wait and don't click Yes before the time is up.

Click Yes in the Apply Changes dialog box when prompted to confirm.
5. You can now close the NVIDIA Control Panel if desired.
- How to add / remove trusted devices for Microsoft accounts
- Ways to rescue data when USB requires Format
- Butterflies fly on the Desktop
- The basics of join.me - Remote Desktop service with many new features
- Share Desktop screen via Yahoo! Messenger
- Change desktop screen continuously by
- Improve Windows with Object Desktop 2008
- Instructions for removing LSE on Lenovo computers
- Windows Live Mail down ... Desktop
- Windows 7 will control with ... touch screen
- Remove nuisance in Windows
- Sony's new computer integrates a TV screen
- Screen Grab Pro 1.4 - Take screenshots with just one click
- Windows Vista: Return to Windows XP
 What is the Snapdragon SiP chip?
 How to create a yellow circle around the mouse cursor on Windows
 Edit the Boot.ini file in Windows XP
 History of formation and development of computers