Instructions for page numbering in Word 2010/2013/2016/2019
For reports, dissertations, internships, and long-form entries, page numbering is essential, making it easy to find and edit. Page numbering for the entire document is probably well known, but any page numbering is a little more complicated.
So invite you to follow the article below to know how to do:
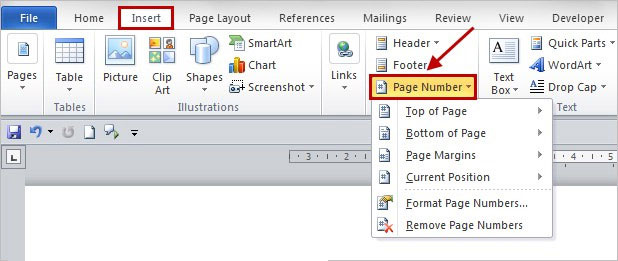
Step 1: Open the text to page up, click the Insert tab > Page Number There will be the following options:
- Top of Page: Number the page at the top of the page.
- Bottom of Page: Number the page at the bottom of the page.
- Page Margins: Number the page on the page margin.
- Current Position: Bookmark the page at the position where the mouse cursor is positioned.
Depending on the purpose of each person to choose accordingly.

Numbering pages in Word
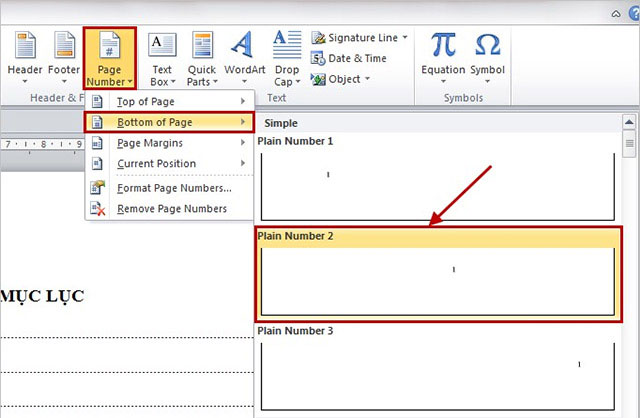
Step 2: If you choose to highlight the middle, bottom of each page, hover on the Bottom of Page , select Plain Number 2 as the middle page style. Dragging the scroll bar in Simple will have many bookmarking styles to choose from. So that text will automatically number the page from start to finish.

How to number pages from any page in Word
Step 1: Numbering pages from any page is a bit more complicated. First you need to put your cursor in the header that you want to start bookmarking.

Step 2: Click the Page Layout tab > Breaks , select Next Page to separate the text into 2 different Sections:
- 1 Section from cursor position to the end of the text and
- 1 Section from beginning to end of the page does not contain the mouse cursor.

Step 3: Next, click on the Insert tab > Page Numbers> Format Page Numbers.

Step 4: The Page Number Format dialog box appears, select the page numbering style in Number Format and select Start at 1 or any starting value you want to start bookmarking. Then click OK.

Step 5: Click the Insert tab > Header / Footer or select Page Number to bookmark. Then choose a bookmark.

Step 6: So you have page numbers for both sections. To remove the page numbers in Section 1, please disconnect the two sections by clicking the yellow link in the Link to Previous section in the Design section of Header & Footer Tools.

Step 7: After you have broken 2 Sections, click Footer Section 1, delete the page number and bookmark type. Then click Close Header and Footer. Thus, Section 1 will no longer have the page number and the page number starting with Section 2 only, from the original cursor position.

So you all know how to number pages in Word already, quite simple, right?
- Instructions to create a notebook with elementary handwriting in Word
- Instructions for fixing common Microsoft Excel errors
- Add even and odd page titles in Word 2007
- 9 best alternatives to Microsoft Word
- Conquer Word 2007 (phase II)
- Create a border (border) for the entire text file
- MS Word: Text paragraph format
- Create links (Link) in MS Word
- How to always display the number of words in Google Docs
- Advanced tricks in MS Word
- MS Word: Create page title (Header) and footer (Footer)
- Some operations with the MS Word window
- Restore the original settings of Word
- 5 extremely useful hidden features and hidden features that people know on Word
 What is the Snapdragon SiP chip?
 How to create a yellow circle around the mouse cursor on Windows
 Edit the Boot.ini file in Windows XP
 3 ways to restart the remote computer via the Internet